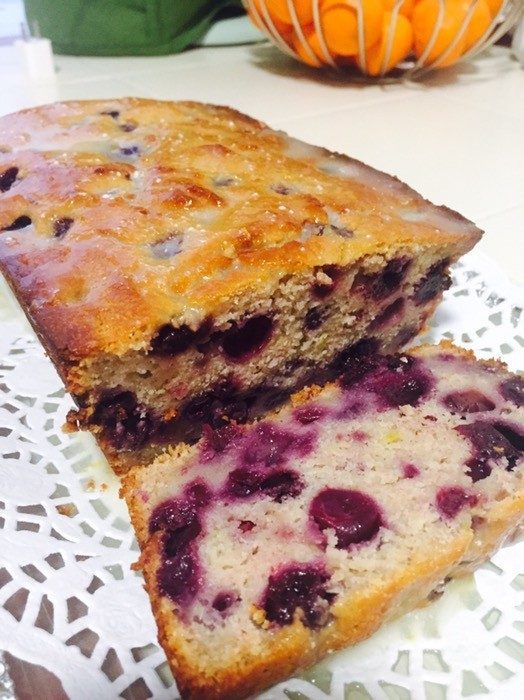
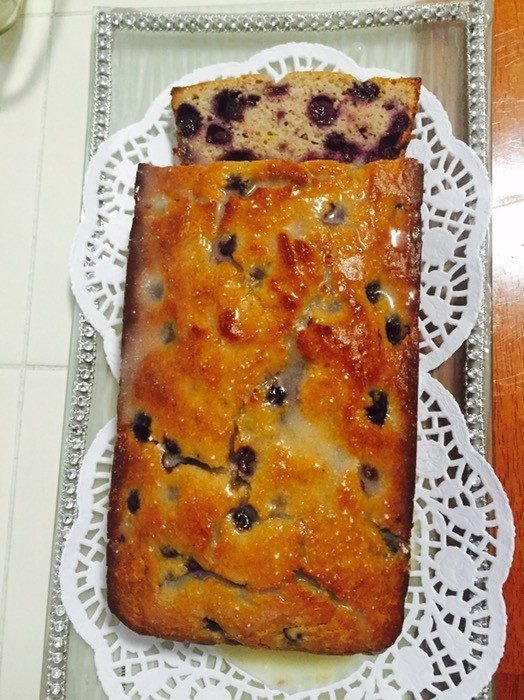
This blueberry lemon loaf is absolutely scrumptious, moist, not mention DELICIOUS! It’s the most perfect pair to the perfect cup of tea or coffee after a long day.
INGREDIENTS:
2 large eggs
1/2 cup sugar (I use Organic Evaporated Cane Sugar)
1/2 teaspoon vanilla extract
1/2 stick unsalted butter or vegan shortening, melted
2 Tbsp Avocado Oil
lemon zest from 1 large lemon
1/4 cup Meyer lemon juice
1/2 cup plain or vanilla nonfat Greek yogurt
1 cup unbleached all-purpose flour
1/2 cup white whole wheat flour
1 -1/2 teaspoons baking powder
1/4 teaspoon salt
1 -1/2 cups organic fresh or frozen blueberries
2 Tbsp flour of choice
For Lemon Glaze:
3 tablespoons Meyer lemon juice
Confectioner’s sugar, about 1 cup
DIRECTIONS:
Preheat oven to 350F. Line an 8×5-inch loaf pan with parchment paper on bottom and 2 sides; this will make lifting the loaf out of the pan super easy!
In a large bowl, cream together the eggs, sugar, vanilla, oil and butter. Whisk in the lemon juice and plain yogurt. In a separate bowl, combine the dry ingredients: flour, baking powder and salt. Whisk in the dry ingredients gradually, whisking well after each addition.
Place blueberries into a bowl and toss together with 2 tablespoons flour until well coated. Fold into the batter using a spatula. Transfer the batter into the prepare loaf pan; spread evenly to edges.
Bake in preheated oven for 50 to 60 minutes, or until top is set. Check for readiness by inserting a toothpick into the center; it needs to come out clean. Remove loaf from pan with the help of the parchment paper and set onto wire rack to cool.
For the lemon glaze, simply whisk together the lemon juice with confectioner’s sugar. Adjust sugar amount to your liking; for a thicker glaze, add more sugar. Drizzle over the loaf. Serve loaf warm, or let cool completely then wrap in plastic wrap. Enjoy!
***original recipe was adapted from Tanya’s Food Everyday.
1 Vegan Stick, melted (I use Organic Earth’s Balance)
2 cups Confectioners Sugar
2/3 Cup Unsweetened Cocoa Powder
2 tsp Vanilla Extract
1/3 Cup Organic Vanilla Almond Milk (you may use any milk that you want), warmed
DIRECTIONS:
Heat your oven to 350 F. Lightly oil and flour two 9 x 9 baking pans. Or use baking spray. While you’re getting everything else ready, go ahead and makea cup of coffee.
In a large bowl, sift together the flour, sugar, cocoa, salt & baking soda until combined well.
In a separate bowl, combine the oil, applesauce, white vinegar, water, warm coffee and vanilla.Add the wet to the dry and stir stir stir.
Pour into two 9 x 9 inch cake pans and bake for 30 minutes.
If you want to eat the cake warm, make the frosting when you have about 5 minutes of baking time left.
It’s so easy, just place the cocoa into the melted vegan stick. Whisk. Add the powdered sugar alternating with the milk until you reach a nice and smooth consistency. Stir in vanilla.
Assemble cake with frosting and add your favorite toppings. I usually enjoy chocolate cake with various berries. This time I had raspberries on hand.
***Original recipe was adapted from Barefoot Contessa.
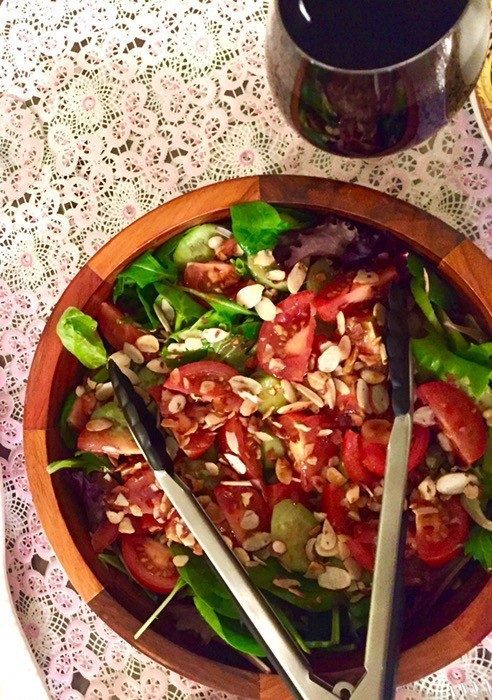
This is my all time favorite salad dressing recipe! I always make a big batch of it and store it in the fridge, which usually lasts me a week. I use about a Tablespoon or 2 at a time for a large salad.
Serves: 6
INGREDIENTS:
Dressing:
2 Tbsp Organic Balsamic Vinegar
1 Tbsp Apple Cider Vinegar
2 cloves Organic Garlic, minced
1 tsp Dijon Mustard
1 tsp Raw Unrefined Honey
1/4 tsp Finely ground black pepper
1/4 Extra Virgin Olive Oil
Salad:
3 Cups Organic Baby Lettuce and Baby Spinach
6 Campari tomatoes, quartered
2 Persian Cucumbers, sliced on a bias
1/4 Cup Organic Sliced Almonds (toast on a dry skillet for 2 minutes on high heat or until fragrant)
2 Tbsp Creamy Balsamic Dressing
DIRECTIONS:
Whisk all ingredients and store in the fridge in a tight container.
For the salad, layer the greens, then cucumbers and tomatoes. Finish off with sprinkling the almonds and drizzle with dressing. Fast, easy, delicious and absolutely nutritious!
4 Boneless, Skinless Chicken Breasts (Butterflied, pounded to 1/4″ thickness and cut in half)
3 Eggs plus 3 Tbsp of water (whisked)
3 Garlic Cloves, minced
1 cup White Cooking Wine
1 Cup Low Sodium Homemade Chicken Stock or Broth
2 Lemons (zest and juice)
2/3 cups Capers (optional)
1 Cup Fresh Chopped Parsley, divided
4 Tbsp Vegan Shortening
DIRECTIONS:
Heat a large deep sauté pan with the avocado oil on medium/high heat.
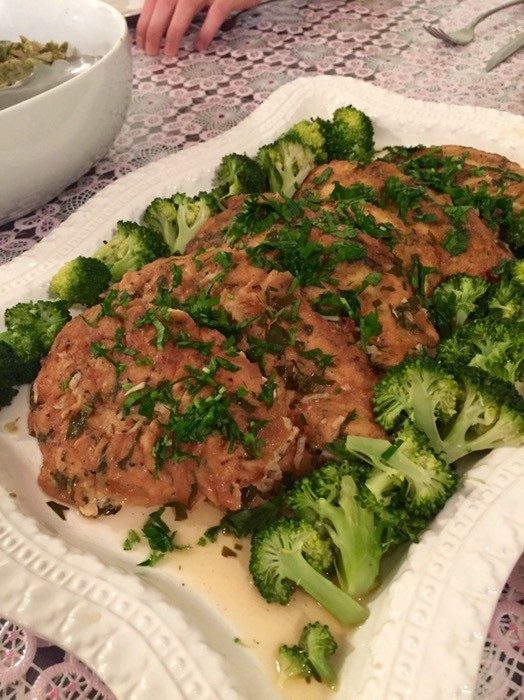
Season your flour with salt, pepper, oregano and basil. Dredge chicken lightly in the flour. Set aside. Using 1/2 of the chopped parsley ( reserve the rest for sauce and garnish), whisk in to the egg wash. Dip chicken breasts into the egg wash and carefully lay it into the pan. Cook 2 min until golden brown, flip and cook an additional 2 minutes. Set aside on a plate. The chicken will finish cooking in the sauce.
Add the minced garlic to the pan and cook for about 20 seconds. Deglaze with the wine, scraping up brown bits with a wooden spoon. Stir in the broth, lemon juice and capers and allow to reduce for 2 minutes.
Add the lemon zest, parsley, vegan butter and swirl to emulsify. Place the chicken back into the pan with the sauce, close lid and cook for 15 min on low heat. Serve with favorite pasta, steamed broccoli, and a salad. Enjoy!
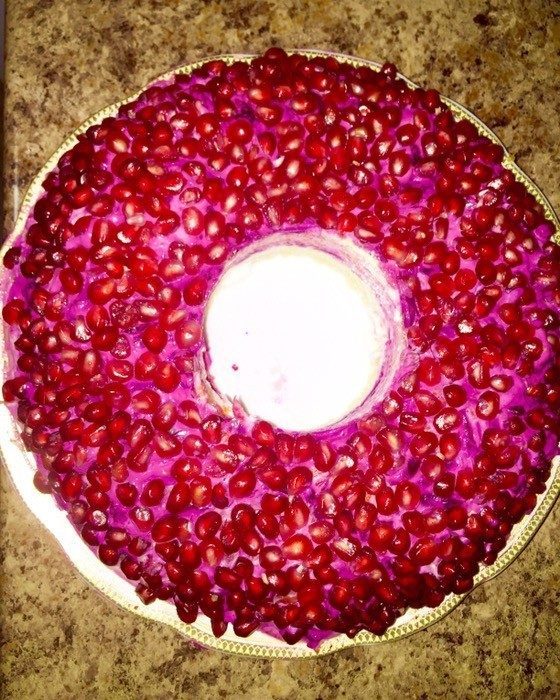
Happy New Years Eve Everyone!!!! My family and I are ringing in the New Year with this absolutely delicious Russian appetizer, Pomegranate Bracelet! It has yummy layers of boiled shredded potatoes, carrots, beets, eggs,sautéed onions & garlic, and poached shredded chicken breast. Sealed with mayonnaise and jeweled with beautiful ruby-like pomegranate seeds! It is a little time consuming but this appetizer is usually made only for the special occasion of starting a new year! It’s totally worth it! ~Makes one large bracelet, enough for 8-10 people depending how large you cut each piece.
Note: To save on calories, use light or Vegan Mayonnaise. Otherwise you may use Original Mayonnaise.
INGREDIENTS: All of the following vegetables must be boiled or steamed until tender, peeled and shredded on the coarse side of a box grater or food processor and set aside before starting your layering process.
3 medium carrots
3 medium potatoes
2 medium beets (boil these separately otherwise you will color all your other veggies)
3 eggs (hard boiled, shelled and shredded on a small side of the box grater)
1 cup walnuts, coarsely ground
2 medium chicken breast halves, poached in salted water, bay leaf and some thyme or sage, drained and shredded
1 large sweet onion and 3 cloves of minced garlic, sautéed
Finely ground Black Pepper
About a cup of Mayonnaise of choice (more or less depending how much you use to dress each later )
1 Large Pomegranate, seeded
DIRECTIONS:
Put a tall drinking glass in the middle of a large flat serving plate. You will arrange the ingredients in layers on the plate around that glass, and remove the class once the appetizer has been assembled. Begin evenly layering the ingredients on the plate in the following order. Sprinkle the layers with some black pepper and salt if you boiled your veggies without salt, but be VERY careful since it’s easy to over salt your layers since mayonnaise also contains salt.
1. Potatoes
2. Mayonnaise (about 2 Tbsps)
3. Half of the Chicken
4. Half of the sautéed onions and garlic
5. Mayo
6. Half of the beets
7. Mayo
8. Carrots
9. Mayo
10. Walnuts
11. Remaining chicken
12. Remaining sautéed onions and garlic
13. Mayo
14. Eggs
15. Mayo
16. Remaining beets
17. Mayo
18. Pomegranate seeds, press a little to adhere
Now you can carefully slide out your glass and cover with plastic wrap and let it set in the refrigerator for at least 1 hour before serving, to allow the flavors for a chance to mingle. ENJOY!
5 Large Sweet Potatoes, peeled and boiled until soft (about 20min)
3/4 Cups Milk ( any kind of brand will work including non dairy. )
3 Tbsp Butter (Vegan spread or coconut oil works well too)
1/2 tsp sea salt
1/2 tsp ground cinnamon
1/4 tsp nutmeg
2-1/2 Cups Mini Marshmallows
DIRECTIONS:
When potatoes are done. Drain and mash them. Add all ingredients except marshmallows. Stir well to combine. Using a 9×13 casserole baking dish. Spread your sweet potato mixture evenly and coat with marshmallows into an even layer. Broil on low for about 2-4 min. Keeping an eye on it to make sure it doesn’t burn.
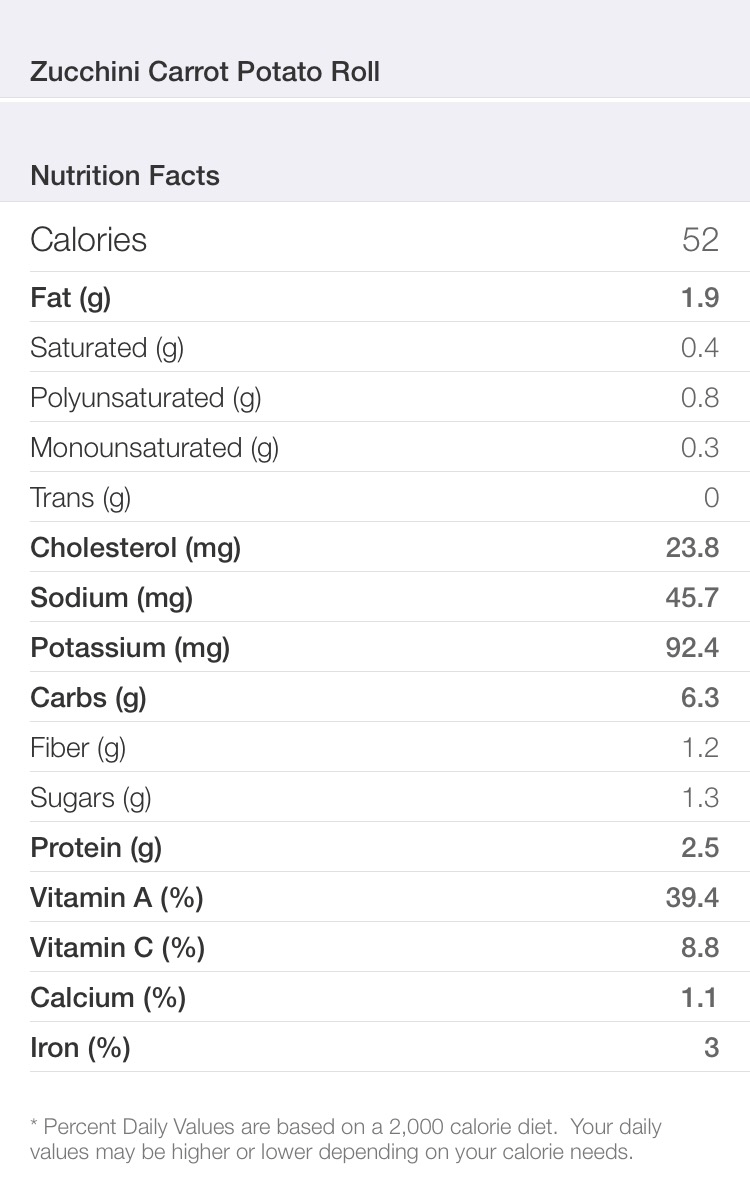
So ever have trouble figuring out an appetizer that everyone including people who dislike veggies will enjoy? Let’s just say, your troubles are over! Thanx to this yummy recipe! It’s packed with nutrients that your guests will thank you for!
INGREDIENTS:
2 medium zucchini
1 medium potato (I like it better with sweet potato)
1 carrot
2 large eggs + 2 egg whites
1/2-3/4 cups white whole wheat flour until consistency of pancake batter is reached.
salt & pepper to taste
INGREDIENTS:
I grate all veggies in my food processor. Then add eggs, flour, salt and pepper and pulse until I reach a creamy consistency.
place on parchment paper using a medium sized cookie sheet. Bake for 400 and bake about 20-30 min depending on ur oven . Once baked cool off lift up don’t worry if it will be stuck to parchment paper I just turn it around use the ugly side as the inside of the roll.
**separately mince garlic and dill. add mayo. mix. Spread over the zucchini cake and roll. Then once rolled, spread some more of the garlic dill mixture on the top.
Prep Time: 30 minutes Cook Time: about 15 to 17 minutes
Total Time: 4+ hours or overnight, for rising
INGREDIENTS:
Dough:
3 1/4 cups Flour (I used White Whole Wheat Flour from Trader Joe’s), or as needed
1/4 cup cane or coconut sugar
2 Tbsp pumpkin pie spice
2 -1/4 tsp instant active dry yeast (one 1/4-ounce packet, I use Red Star Platinum)
pinch salt, to taste
1/2 cup vegan butter
1/2 cup Trader Joe’s Plain Cultured Cashew Beverage
1/2 cup organic pumpkin puree
1 large egg, lightly whisked
Filling:
4 tablespoons vegan butter or coconut oil (if using butter it has to be very soft – let it sit out while dough is rising)
1 cup light brown sugar, packed
2 Tbsp ground cinnamon
Cream Cheese Glaze:
4 ounces vegan cream cheese, room temperature – let it sit out on the second rise or while rolls bake.
1-1/2 cups confectioners’ sugar
pinch sea salt, optional and to taste (helps balance the sweetness)
about 3 Tbsp unsweetened plant based milk
DIRECTIONS:
1. Dough – To the bowl of a stand mixer fitted with the dough hook (or use a large mixing bowl and wooden spoon and your hands), add 3 1/4 cups flour, sugar, pumpkin pie spice, yeast, salt; set aside.
2. In 2-cup glass measuring cup or microwave-safe bowl, add the butter and heat to melt, about 1 minute on high power.
3. Add buttermilk and pumpkin to melted butter and warm, about 45 seconds on high power in the microwave. (Based on the type of yeast used, temperatures will vary. Red Star Platinum yeast calls for warmer temperatures than most, 120 to 130F; other brands and yeast call for much lower temperatures, about 95 to 105F. Heat the mixture according to manufacturer’s recommendations on the packaging. Taking the temperature with a digital thermometer is highly recommended, but if you’re not, make sure the milk is warm, not hot. Err on the cooler rather than hotter side so you don’t kill the yeast.) If the milk separates or gets a little funny looking after being warmed, whisk it to smooth it out.
4. Add butter-buttermilk-pumpkin mixture to the dry ingredients in mixing bowl.
5. In a small bowl, crack and lightly whisk the egg, and add egg to mixing bowl.
6. Turn mixer on low speed and allow it to knead dough for about 7 minutes (about 7 to 10 minutes by hand using a wooden spoon and then switching to your hands). 3 1/4 cups of flour and 7 minutes is perfect for me, but if after 5 minutes your dough is very sloppy, wet, and won’t come together, add up to 1/4 cup flour, or as needed until it does come together. However, the more flour added, the denser and heavier the rolls will be; wetter dough is preferred to overly dry. If dough is dry or crumbly, drizzle in buttermilk until it comes together.
7. Remove dough from the mixing bowl, spray a large bowl with cooking spray, place the dough in the bowl, and flip it over once so it’s lightly oiled on both top and bottom.
8. Cover bowl with plasticwrap (spray it with cooking spray in case dough rises high enough to touch it) and place bowl in a warm, draft-free place to rise for about 2 to 2 1/2 hours, or doubled in size. I keep my bowl inside a powered-off oven that I preheated for 1 minute to 400F, then it’s powered off. Do not, repeat do not, keep the oven on. The pre-heated, warm oven creates a nice 85F-ish environment, ideal for yeast. If your rising spot is cold, rising will likely take longer than 2 1/2 hours.
9. While dough rises, line a 9×13-inch aluminum pan with aluminum foil, spray with cooking spray; set aside.
10. Rolling Out the Dough – After dough has doubled in size, punch it down. Turn dough out onto a Silpat or floured countertop. With a rolling pin, roll it out to about 26-by-13-inches. Use the 13-inch side of the 9-x13 pan to eyeball it, no need use a ruler.
11. Filling – Using an offset spatula, evenly spread butter over dough, leaving a 1/2-inch bare margin.
12. Evenly sprinkle the brown sugar and then the cinnamon over the top, and lightly pat it down with your fingertips to help it adhere.
13. Slicing the Dough – Starting with a long edge (the 26-inch side), roll the dough into a tightly wound log, with the seam side down.
14. Using a knife, make small hash marks about 1 to 1 1/2 inches apart (yields 20 to 24 rolls); or make bigger rolls and yield 12 to 16. Hash marks create less guesswork once you start slicing and things get messier and harder to eyeball where to slice; the hash marks are nice place-markers.
15. Use plain, unwaxed dental floss to slice the rolls. I highly recommend slicing the rolls with floss, not knives. Floss does not squish or compact the log like knives do.
16. Arrange the rolls in the prepared pan (I made 5 rows of 4 or 5 rolls across, and not all rows have same number of rolls; crowding is okay). Cover with clean kitchen towel.
17. Make Straight Through – Let rise in a warm, draft-free place until the rolls have nearly doubled in size, about 1 hour.
18.Or…Make as Overnight Rolls – Don’t let rolls rise after they’ve been sliced and placed in covered pan. Place pan in refrigerator for up to 16 hours. Before baking, let the rolls rise at room temperature until they have nearly doubled in size, about 1 hour.
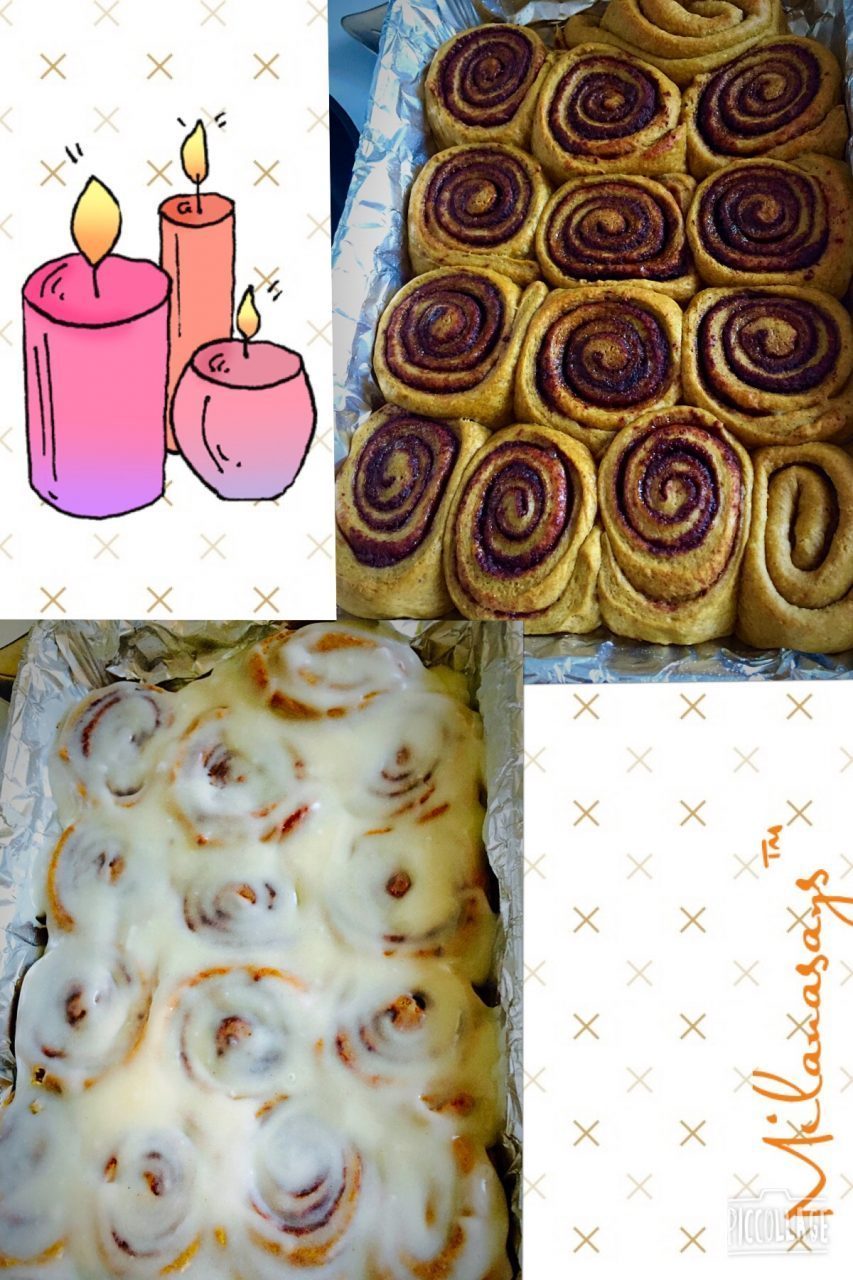
19. Baking -For either version, bake at 375F for about 15 to 17 minutes, or until lightly golden on top and cooked through (ovens, dough, and climates vary and so will baking duration, but 1 to 2 minutes matters in this recipe). Watch rolls like a hawk and don’t overbake or they won’t taste nearly as good. At 15 1/2 minutes my rolls were barely done and on the doughy side but I prefer this because it reminds me of Cinnabons; if you like less doughy rolls, bake longer.
20. Cream Cheese Glaze – In a medium bowl, add cream cheese, confectioners’ sugar, optional salt, 3 tablespoons milk, and whisk or beat with a handheld electric mixer until smooth and combined. Add milk as needed until desired consistency is reached.
21. Evenly pour glaze over rolls, lightly spreading with a spatula as necessary.
22. Serve immediately. Rolls are best warm and fresh, but will keep airtight at room temp for up to 4 days; reheat in microwave for about 5 seconds to re-soften or as desired. I am comfortable keeping glazed rolls at room temp and do not recommend storing them in the fridge because they will dry out. Rolls can be made and baked to completion, and then frozen for up to 6 months; unthaw and glaze immediately prior to serving. I recommend baking them from start to finish and then freezing, rather than trying to freeze unbaked dough, if you want to make in bulk in advance.
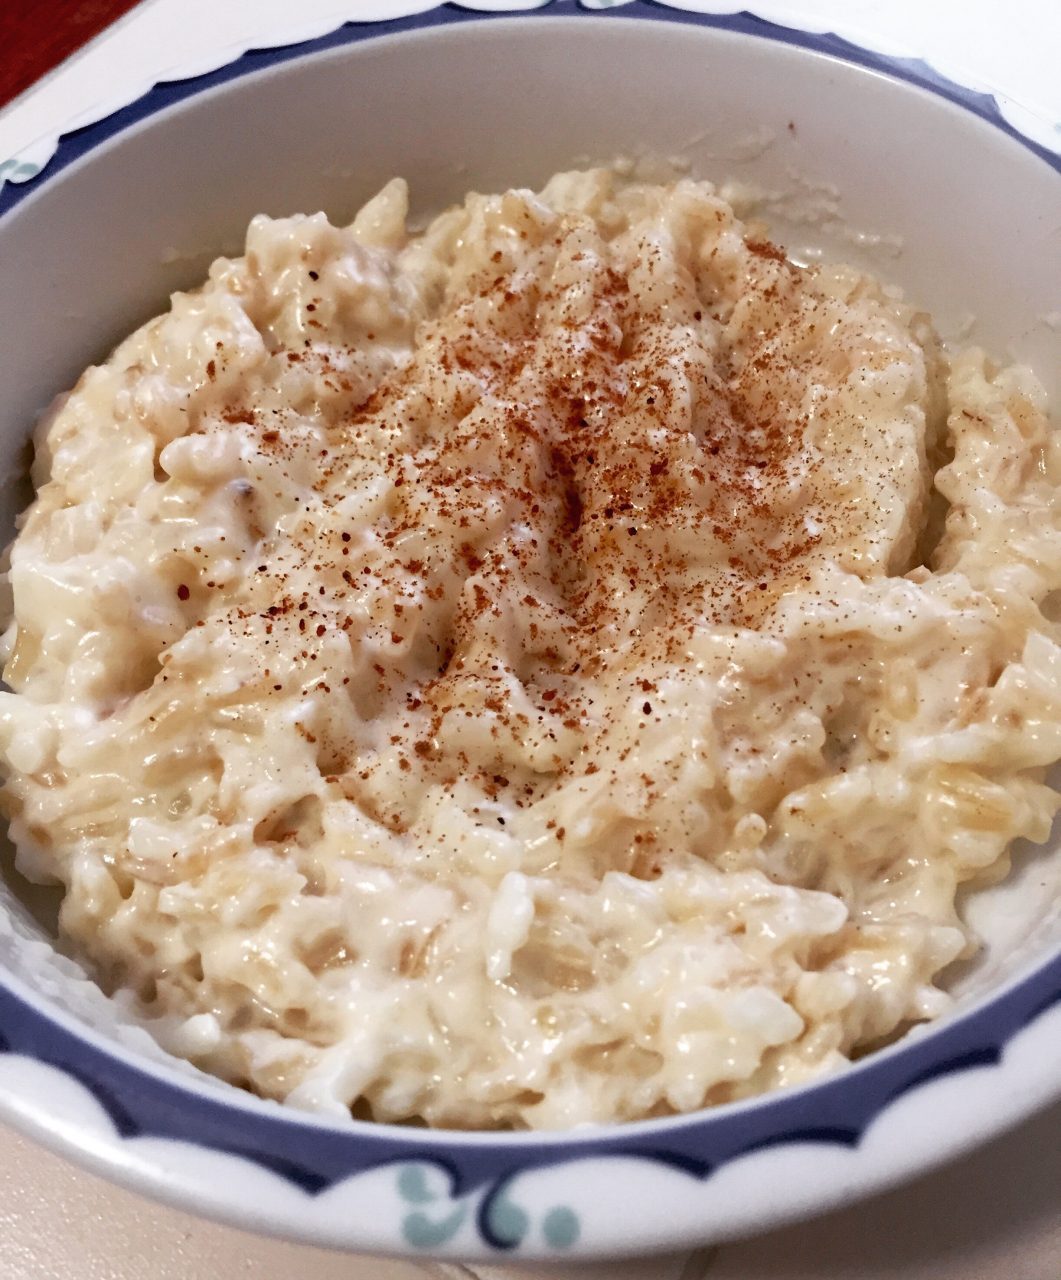
This was my first time making rice pudding and I wanted to make it with some fiber, but also not too much so that my daughter doesn’t have bloating, and flatulence due to a high fiber content. Children ages 3- 5 can only have about 11 grams per day. Anything more than that can discomfort their GI tract. So what I did was use half parboiled brown rice and half regular white medium grain rice.
INGREDIENTS:
1/4 cup washed parboiled whole grain rice (I use Unlce Ben’s)
1/4 cup washed white rice
2-1/4 Cups Organic Whole Milk
1 Tbsp of Organic Butter
1 Tbsp turbinado sugar or 100% maple syrup (if you like it sweeter you may add more )
1 tsp vanilla extract
DIRECTIONS:
In a heavy duty sauce pan. Combine the rice, sugar, butter and milk and stir. Bring to a slow boil. Reduce the heat to low and simmer stirring every 2 minutes for 45 minutes until the consistency becomes thick and rice becomes very tender. Turn off heat and stir in your vanilla. Serve with a dust of Ceylon Cinnamon and a pinch of Nutmeg for warmth. Enjoy!
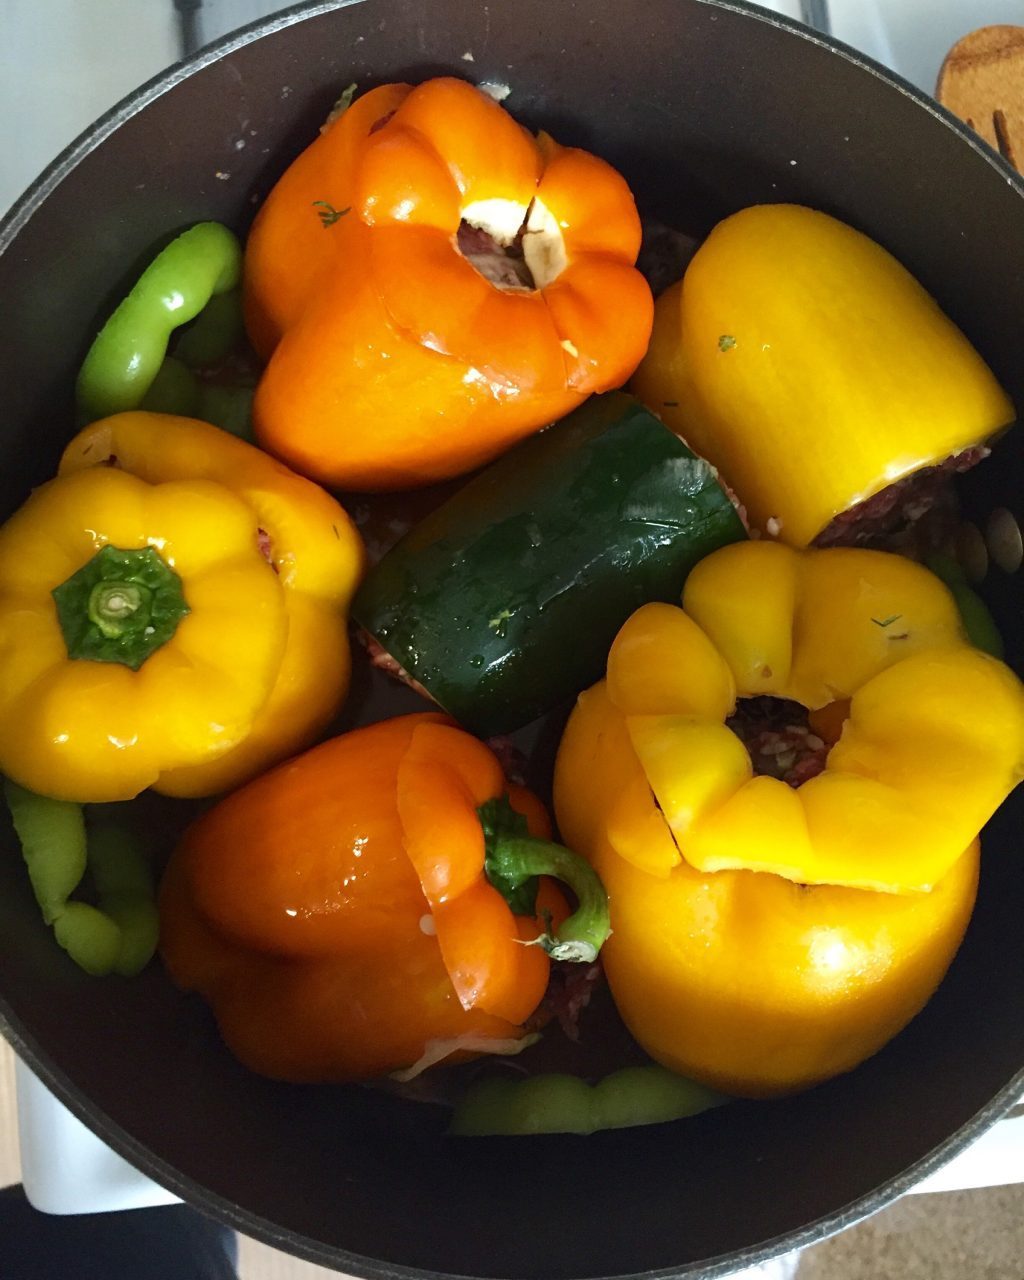
Hey everyone! Hope your weekend is going well….so many people have asked me for my fool proof stuffed peppers recipe and I just never got around to posting the recipe. My sister, Diana has perfected this recipe since my Mother gave it to her years ago. Diana has now passed it down to me and I made it as-is for the first few times-which was finger lickin good… and then with time I added a couple of ingredients to make it my own. Here it is…..hope you all enjoy it as much as we do. Happy Cooking!
INGREDIENTS:
2 lbs Extra Lean Ground Beef
1/4 Cup Parboiled Brown Rice (I use Uncle Bens), washed and drained
3/4 Cups Medium Grain Fancy White Rice (I use Kokuho Yellow), washed and drained
1 bunch of Fresh Dill, finely chopped
1 large zuchinni, unpeeled and grated
4 large Italian Green Bell Peppers; washed, ribbed and seeded
7 small to medium orange, yellow, & red bell peppers; washed, ribbed & seeded
4 Large Beefsteak Tomatoes (or any large tomatoes will do), chopped
3 Tbsp Avocado oil
Salt & pepper
1 tsp coriander
1/2 can Chickpeas (optional)
1-1/2 Cups of Sour, unripe plums (alcha), washed in boiling water until water is clean
6 cups Boiling Water
DIRECTIONS:
In a large bowl mix your ground meat, dill, rice, zucchini, coriander, salt and pepper. Set aside to rest for 10 minutes.
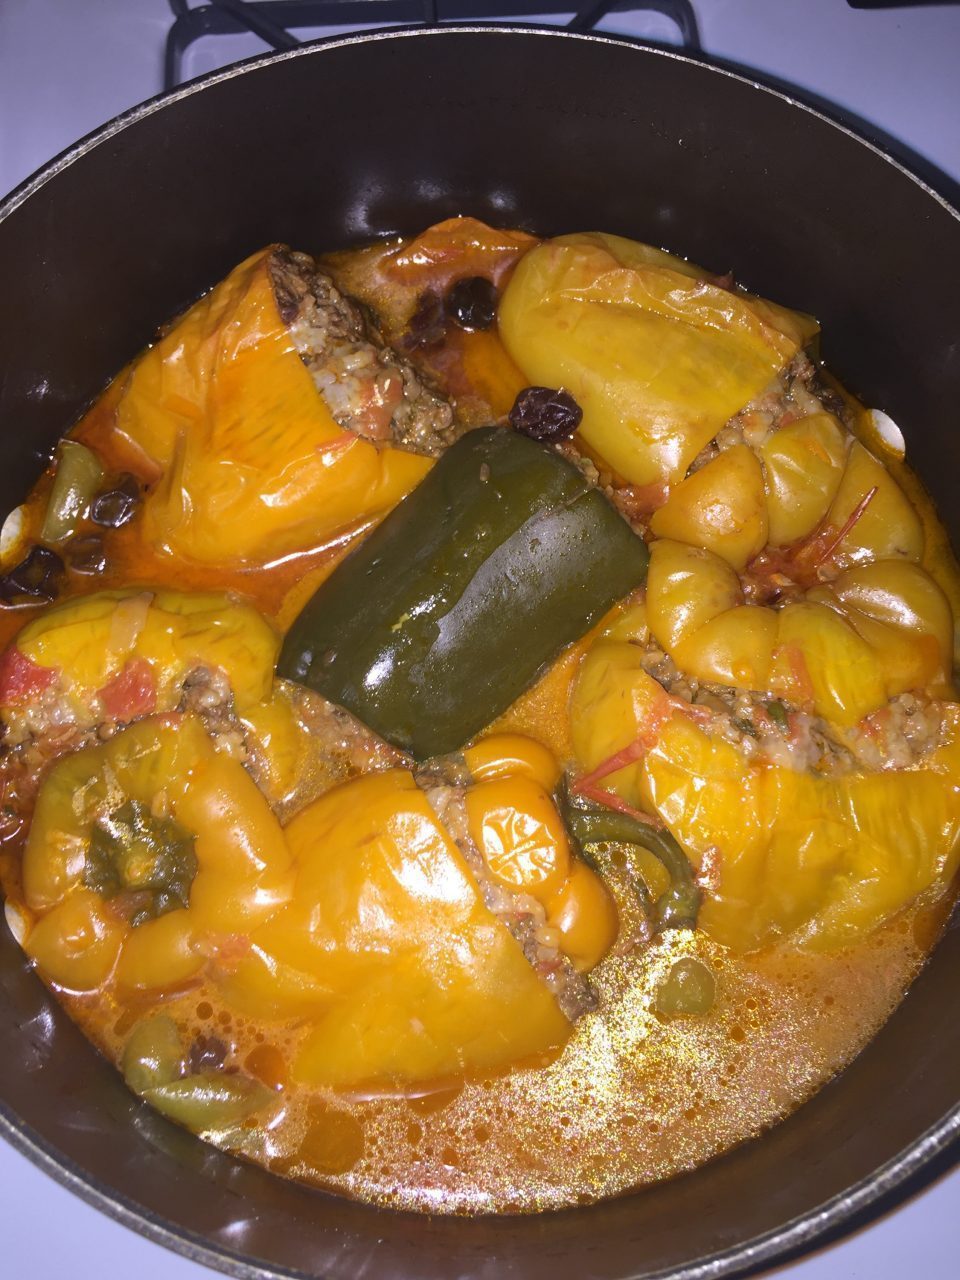
In the meantime, heat oil in 6 quart pot. Add tomatoes and sauté for about 5 minutes on medium high heat. Add some salt to taste. Let simmer for an additional 5 minutes on very low heat.
Before stuffing your peppers, lightly sprinkle some salt in the cavity. Stuff with ground beef mixture packing tightly to the top and leveling off with your fingers.
Sprinkle 3/4 cups of your sour plums on top of the tomatoes in the pot. Start layering the stuffed peppers on top. After layering, sprinkle the rest of the sour plums on top on the peppers and pour your boiling water all way to the top of the peppers. Peppers should peek out of the water about an inch. Bring to a boil on high heat. Then cover lid tightly and let simmer on very low heat for 2 hours. Checking every hour if it needs more boiling water.