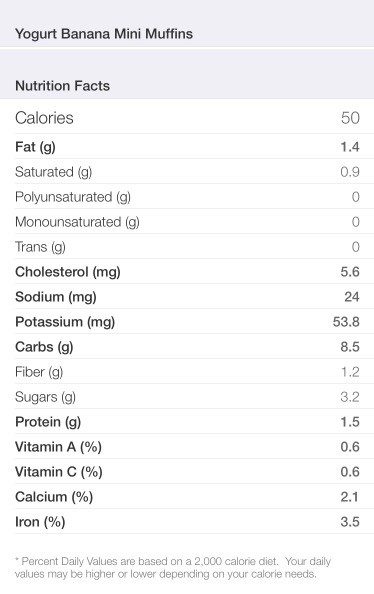
Preheat oven to 375ºF and coat 36 mini muffin pan with cooking spray (use three 12 mini muffin pans).
In a large mixing bowl, combine yogurt, milk, oats, vanilla extract and egg. Set aside 5 minutes for oats to soften and then stir in banana.
In a separate bowl, stir together flour, brown sugar, baking powder, baking soda and salt. Stir flour mixture into yogurt mixture to moisten ingredients (do not beat – the dough will be very thick). Save 1 tablespoon of chocolate chips for muffin tops, and stir in the rest.
Spoon batter by heaping tablespoons or use a small cookie scoop (1 oz) into prepared muffin pans; sprinkle each with a few reserved chocolate chips. Bake until golden brown and a tester inserted in center of a muffin comes out clean (about 15 minutes).
3/4 cups Fat Free Ricotta (you may use whole milk or part skim)
6 oz. Mascarpone Cheese
3/4 cup Skinny or Regular True Whip (sold at Whole Foods)
2-3 Tbsp Evaporated Cane Sugar or any sweetener of choice
1/2 tsp Vanilla Extract
1/4 cup Mini Dark Chocolate Chips
DIRECTIONS:
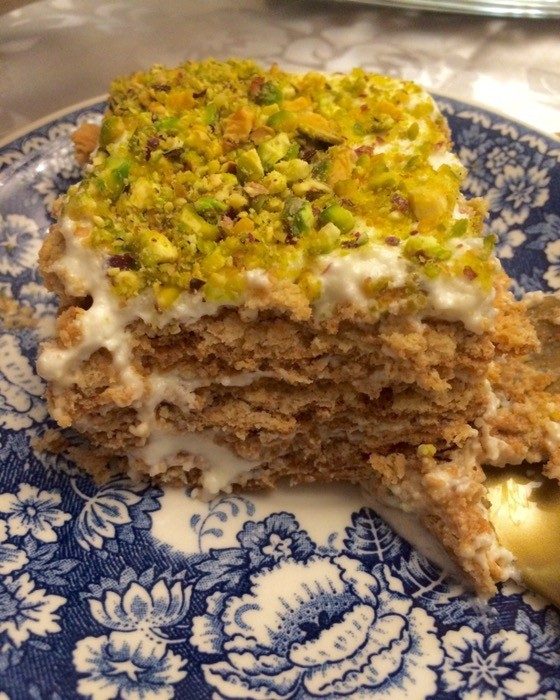
First, make the shells: place a wafer directly on to the microwave dish and heat it up for 23 seconds (I have tested all numbers and 23 seems to be the perfect temperature to form into the shells) immediately take the wafer and quickly but gently shape the wafer into a cannoli she’ll with your fingers (becareful it is quite hot). Set aside to cool. Do the same with the rest of the shells. I am sure this can be accomplished by using a dry skillet but I have not tried this yet. If you do, let me know how it turns out.
For the filling:In the bowl of your stand mixer fitted with the whisk attachment or a large bowl with a hand mixer, place the ricotta, mascarpone, sugar, vanilla and salt, and beat on medium speed to combine well. Gently fold in the True Whip and chocolate chips, cover the bowl and place it in the refrigerator to chill.
Filling the cannoli: Before serving, once the cannoli shells are cool, remove the filling from the refrigerator and unwrap it. Transfer it to a piping bag and pipe the filling into each cooled shell, piping from both ends toward the center of the shell. Dust lightly with confectioners’ sugar and serve with some strawberries or raspberries on the side. Serve only the amount you know will be consumed since the filling will soften the shells within an hour after filling them. Unfilled shells can be stored in an airtight container for up to 6 months. Filling can be frozen for up to a month and refrigerated for 3 days.
Needed a last minute pot -luck dessert, but without enough time to bake one. Thought of what I can put together that I had on hand and to my surprise this deliciousness was created! At first I thought it would taste close to a Teramisu since I used some of the ingredients that a Traditional Teramisu recipe requires. However, after a few taste tests, we all agreed that it mimics the Traditional Armenian Honey Cake instead. I was very pleased because that’s actually my FAVORITE cake ever!!!!! Give this easy dessert a try and I promise you’ll be making it over and over again!
Yields: 1-8×8. Serves: about 9-10 people depending how big/small you cut the squares.
INGREDIENTS:
Filling:
1 container of True Whip ( healthier version of Cool Whip, sold at Whole Foods or Fairway)or So Delicious Frozen Whipped Topping, Thawed in the Fridge
8 ounces mascarpone cheese (find it in the artisan cheese section)
3 Tbsp Organic Evaporated Cane sugar
1/2 teaspoon vanilla extract
Cake:
1 box whole grain Honey graham crackers (sold at Whole Foods or Trader Joes)
1 cup instant or brewed coffee, cooled (I used decaf)
1/2 cup of finely chopped Pistachios
Coconut cooking spray
DIRECTIONS:
Line an 8×8-inch deep-sided baking or casserole pan with parchment paper or grease it lightly with coconut cooking spray.
In a large mixing bowl on low speed beat the mascarpone, sugar and vanilla until fluffy about 2 minutes.
Add your Frozen Whipped Topping and gently fold it together. Set aside 1 cup of the mixture for the top.
Line the bottom of the pan with a single layer of graham crackers, breaking them to fit. Use a pastry brush and brush them generously with the coffee.
Repeat with another layer of graham crackers and coffee.
Spoon half the mascarpone into the pan and spread it evenly from edge to edge.
Top with a layer of graham crackers and brush with coffee then repeat with a second layer of crackers and coffee.
Spoon the remaining mascarpone into the pan and spread it evenly from edge to edge.
Top with another layer of graham crackers, brush with coffee, then repeat with a second layer of crackers and coffee.
Spoon the cup of cream you set aside over that and spread it out evenly. Top with chopped pistachios. Cover with plastic and refrigerate for at least an hour or overnight. Enjoy!
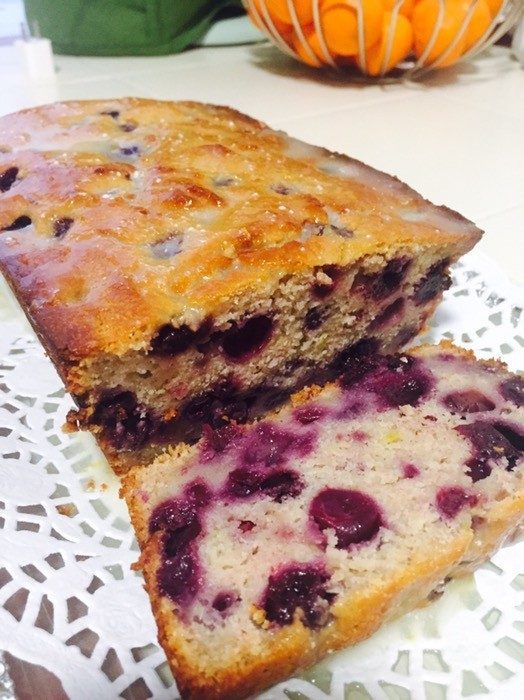
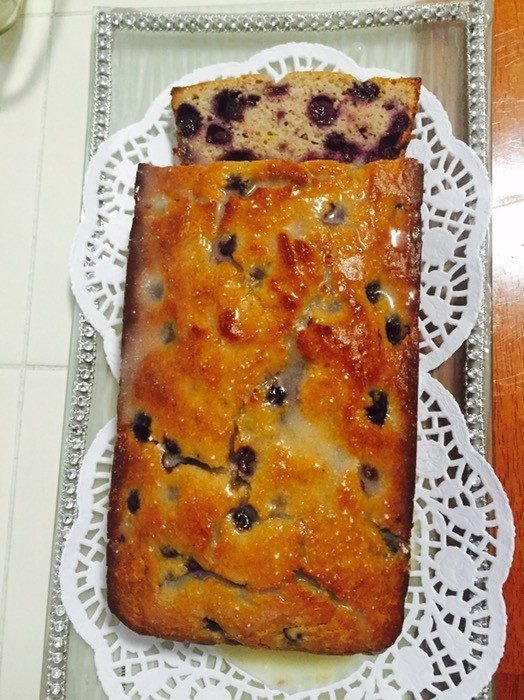
This blueberry lemon loaf is absolutely scrumptious, moist, not mention DELICIOUS! It’s the most perfect pair to the perfect cup of tea or coffee after a long day.
INGREDIENTS:
2 large eggs
1/2 cup sugar (I use Organic Evaporated Cane Sugar)
1/2 teaspoon vanilla extract
1/2 stick unsalted butter or vegan shortening, melted
2 Tbsp Avocado Oil
lemon zest from 1 large lemon
1/4 cup Meyer lemon juice
1/2 cup plain or vanilla nonfat Greek yogurt
1 cup unbleached all-purpose flour
1/2 cup white whole wheat flour
1 -1/2 teaspoons baking powder
1/4 teaspoon salt
1 -1/2 cups organic fresh or frozen blueberries
2 Tbsp flour of choice
For Lemon Glaze:
3 tablespoons Meyer lemon juice
Confectioner’s sugar, about 1 cup
DIRECTIONS:
Preheat oven to 350F. Line an 8×5-inch loaf pan with parchment paper on bottom and 2 sides; this will make lifting the loaf out of the pan super easy!
In a large bowl, cream together the eggs, sugar, vanilla, oil and butter. Whisk in the lemon juice and plain yogurt. In a separate bowl, combine the dry ingredients: flour, baking powder and salt. Whisk in the dry ingredients gradually, whisking well after each addition.
Place blueberries into a bowl and toss together with 2 tablespoons flour until well coated. Fold into the batter using a spatula. Transfer the batter into the prepare loaf pan; spread evenly to edges.
Bake in preheated oven for 50 to 60 minutes, or until top is set. Check for readiness by inserting a toothpick into the center; it needs to come out clean. Remove loaf from pan with the help of the parchment paper and set onto wire rack to cool.
For the lemon glaze, simply whisk together the lemon juice with confectioner’s sugar. Adjust sugar amount to your liking; for a thicker glaze, add more sugar. Drizzle over the loaf. Serve loaf warm, or let cool completely then wrap in plastic wrap. Enjoy!
***original recipe was adapted from Tanya’s Food Everyday.
1 Vegan Stick, melted (I use Organic Earth’s Balance)
2 cups Confectioners Sugar
2/3 Cup Unsweetened Cocoa Powder
2 tsp Vanilla Extract
1/3 Cup Organic Vanilla Almond Milk (you may use any milk that you want), warmed
DIRECTIONS:
Heat your oven to 350 F. Lightly oil and flour two 9 x 9 baking pans. Or use baking spray. While you’re getting everything else ready, go ahead and makea cup of coffee.
In a large bowl, sift together the flour, sugar, cocoa, salt & baking soda until combined well.
In a separate bowl, combine the oil, applesauce, white vinegar, water, warm coffee and vanilla.Add the wet to the dry and stir stir stir.
Pour into two 9 x 9 inch cake pans and bake for 30 minutes.
If you want to eat the cake warm, make the frosting when you have about 5 minutes of baking time left.
It’s so easy, just place the cocoa into the melted vegan stick. Whisk. Add the powdered sugar alternating with the milk until you reach a nice and smooth consistency. Stir in vanilla.
Assemble cake with frosting and add your favorite toppings. I usually enjoy chocolate cake with various berries. This time I had raspberries on hand.
***Original recipe was adapted from Barefoot Contessa.
Prep Time: 30 minutes Cook Time: about 15 to 17 minutes
Total Time: 4+ hours or overnight, for rising
INGREDIENTS:
Dough:
3 1/4 cups Flour (I used White Whole Wheat Flour from Trader Joe’s), or as needed
1/4 cup cane or coconut sugar
2 Tbsp pumpkin pie spice
2 -1/4 tsp instant active dry yeast (one 1/4-ounce packet, I use Red Star Platinum)
pinch salt, to taste
1/2 cup vegan butter
1/2 cup Trader Joe’s Plain Cultured Cashew Beverage
1/2 cup organic pumpkin puree
1 large egg, lightly whisked
Filling:
4 tablespoons vegan butter or coconut oil (if using butter it has to be very soft – let it sit out while dough is rising)
1 cup light brown sugar, packed
2 Tbsp ground cinnamon
Cream Cheese Glaze:
4 ounces vegan cream cheese, room temperature – let it sit out on the second rise or while rolls bake.
1-1/2 cups confectioners’ sugar
pinch sea salt, optional and to taste (helps balance the sweetness)
about 3 Tbsp unsweetened plant based milk
DIRECTIONS:
1. Dough – To the bowl of a stand mixer fitted with the dough hook (or use a large mixing bowl and wooden spoon and your hands), add 3 1/4 cups flour, sugar, pumpkin pie spice, yeast, salt; set aside.
2. In 2-cup glass measuring cup or microwave-safe bowl, add the butter and heat to melt, about 1 minute on high power.
3. Add buttermilk and pumpkin to melted butter and warm, about 45 seconds on high power in the microwave. (Based on the type of yeast used, temperatures will vary. Red Star Platinum yeast calls for warmer temperatures than most, 120 to 130F; other brands and yeast call for much lower temperatures, about 95 to 105F. Heat the mixture according to manufacturer’s recommendations on the packaging. Taking the temperature with a digital thermometer is highly recommended, but if you’re not, make sure the milk is warm, not hot. Err on the cooler rather than hotter side so you don’t kill the yeast.) If the milk separates or gets a little funny looking after being warmed, whisk it to smooth it out.
4. Add butter-buttermilk-pumpkin mixture to the dry ingredients in mixing bowl.
5. In a small bowl, crack and lightly whisk the egg, and add egg to mixing bowl.
6. Turn mixer on low speed and allow it to knead dough for about 7 minutes (about 7 to 10 minutes by hand using a wooden spoon and then switching to your hands). 3 1/4 cups of flour and 7 minutes is perfect for me, but if after 5 minutes your dough is very sloppy, wet, and won’t come together, add up to 1/4 cup flour, or as needed until it does come together. However, the more flour added, the denser and heavier the rolls will be; wetter dough is preferred to overly dry. If dough is dry or crumbly, drizzle in buttermilk until it comes together.
7. Remove dough from the mixing bowl, spray a large bowl with cooking spray, place the dough in the bowl, and flip it over once so it’s lightly oiled on both top and bottom.
8. Cover bowl with plasticwrap (spray it with cooking spray in case dough rises high enough to touch it) and place bowl in a warm, draft-free place to rise for about 2 to 2 1/2 hours, or doubled in size. I keep my bowl inside a powered-off oven that I preheated for 1 minute to 400F, then it’s powered off. Do not, repeat do not, keep the oven on. The pre-heated, warm oven creates a nice 85F-ish environment, ideal for yeast. If your rising spot is cold, rising will likely take longer than 2 1/2 hours.
9. While dough rises, line a 9×13-inch aluminum pan with aluminum foil, spray with cooking spray; set aside.
10. Rolling Out the Dough – After dough has doubled in size, punch it down. Turn dough out onto a Silpat or floured countertop. With a rolling pin, roll it out to about 26-by-13-inches. Use the 13-inch side of the 9-x13 pan to eyeball it, no need use a ruler.
11. Filling – Using an offset spatula, evenly spread butter over dough, leaving a 1/2-inch bare margin.
12. Evenly sprinkle the brown sugar and then the cinnamon over the top, and lightly pat it down with your fingertips to help it adhere.
13. Slicing the Dough – Starting with a long edge (the 26-inch side), roll the dough into a tightly wound log, with the seam side down.
14. Using a knife, make small hash marks about 1 to 1 1/2 inches apart (yields 20 to 24 rolls); or make bigger rolls and yield 12 to 16. Hash marks create less guesswork once you start slicing and things get messier and harder to eyeball where to slice; the hash marks are nice place-markers.
15. Use plain, unwaxed dental floss to slice the rolls. I highly recommend slicing the rolls with floss, not knives. Floss does not squish or compact the log like knives do.
16. Arrange the rolls in the prepared pan (I made 5 rows of 4 or 5 rolls across, and not all rows have same number of rolls; crowding is okay). Cover with clean kitchen towel.
17. Make Straight Through – Let rise in a warm, draft-free place until the rolls have nearly doubled in size, about 1 hour.
18.Or…Make as Overnight Rolls – Don’t let rolls rise after they’ve been sliced and placed in covered pan. Place pan in refrigerator for up to 16 hours. Before baking, let the rolls rise at room temperature until they have nearly doubled in size, about 1 hour.
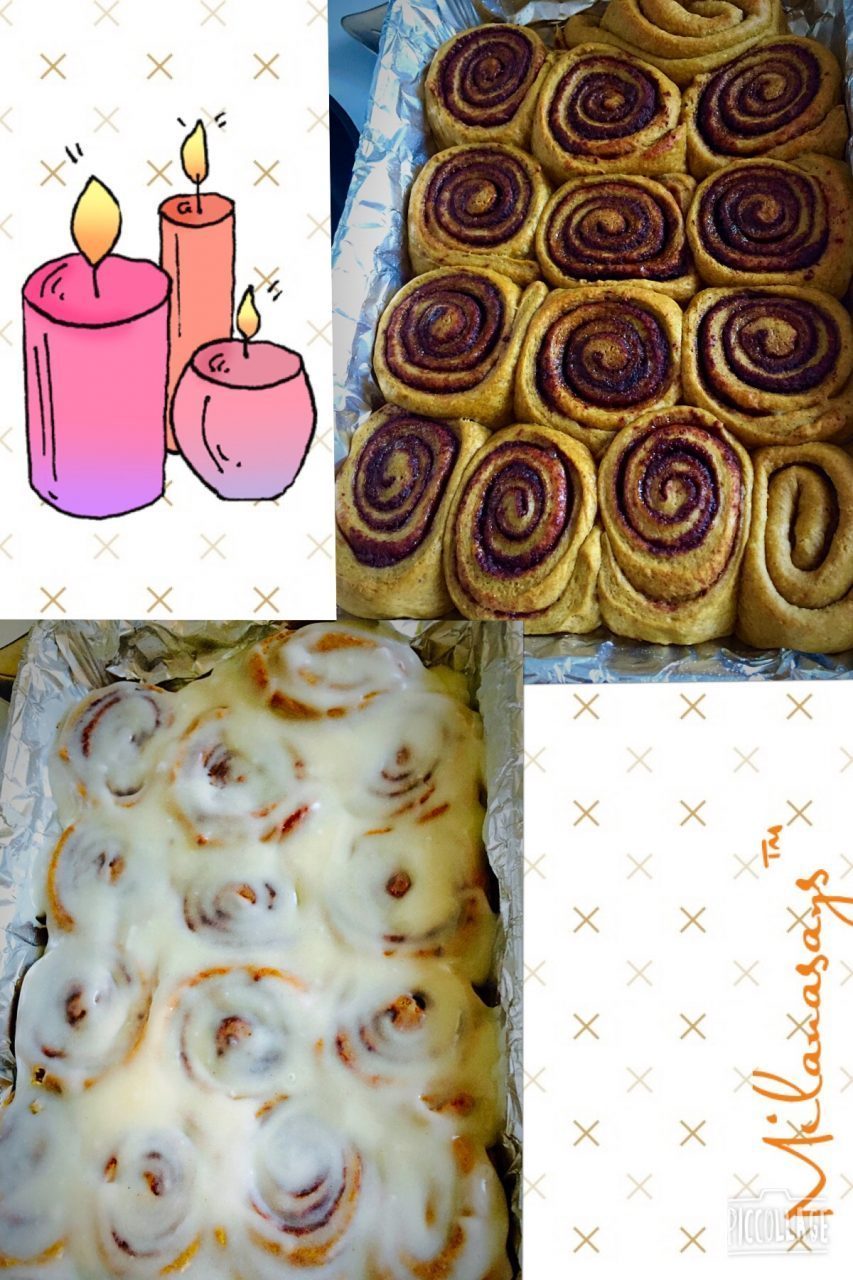
19. Baking -For either version, bake at 375F for about 15 to 17 minutes, or until lightly golden on top and cooked through (ovens, dough, and climates vary and so will baking duration, but 1 to 2 minutes matters in this recipe). Watch rolls like a hawk and don’t overbake or they won’t taste nearly as good. At 15 1/2 minutes my rolls were barely done and on the doughy side but I prefer this because it reminds me of Cinnabons; if you like less doughy rolls, bake longer.
20. Cream Cheese Glaze – In a medium bowl, add cream cheese, confectioners’ sugar, optional salt, 3 tablespoons milk, and whisk or beat with a handheld electric mixer until smooth and combined. Add milk as needed until desired consistency is reached.
21. Evenly pour glaze over rolls, lightly spreading with a spatula as necessary.
22. Serve immediately. Rolls are best warm and fresh, but will keep airtight at room temp for up to 4 days; reheat in microwave for about 5 seconds to re-soften or as desired. I am comfortable keeping glazed rolls at room temp and do not recommend storing them in the fridge because they will dry out. Rolls can be made and baked to completion, and then frozen for up to 6 months; unthaw and glaze immediately prior to serving. I recommend baking them from start to finish and then freezing, rather than trying to freeze unbaked dough, if you want to make in bulk in advance.
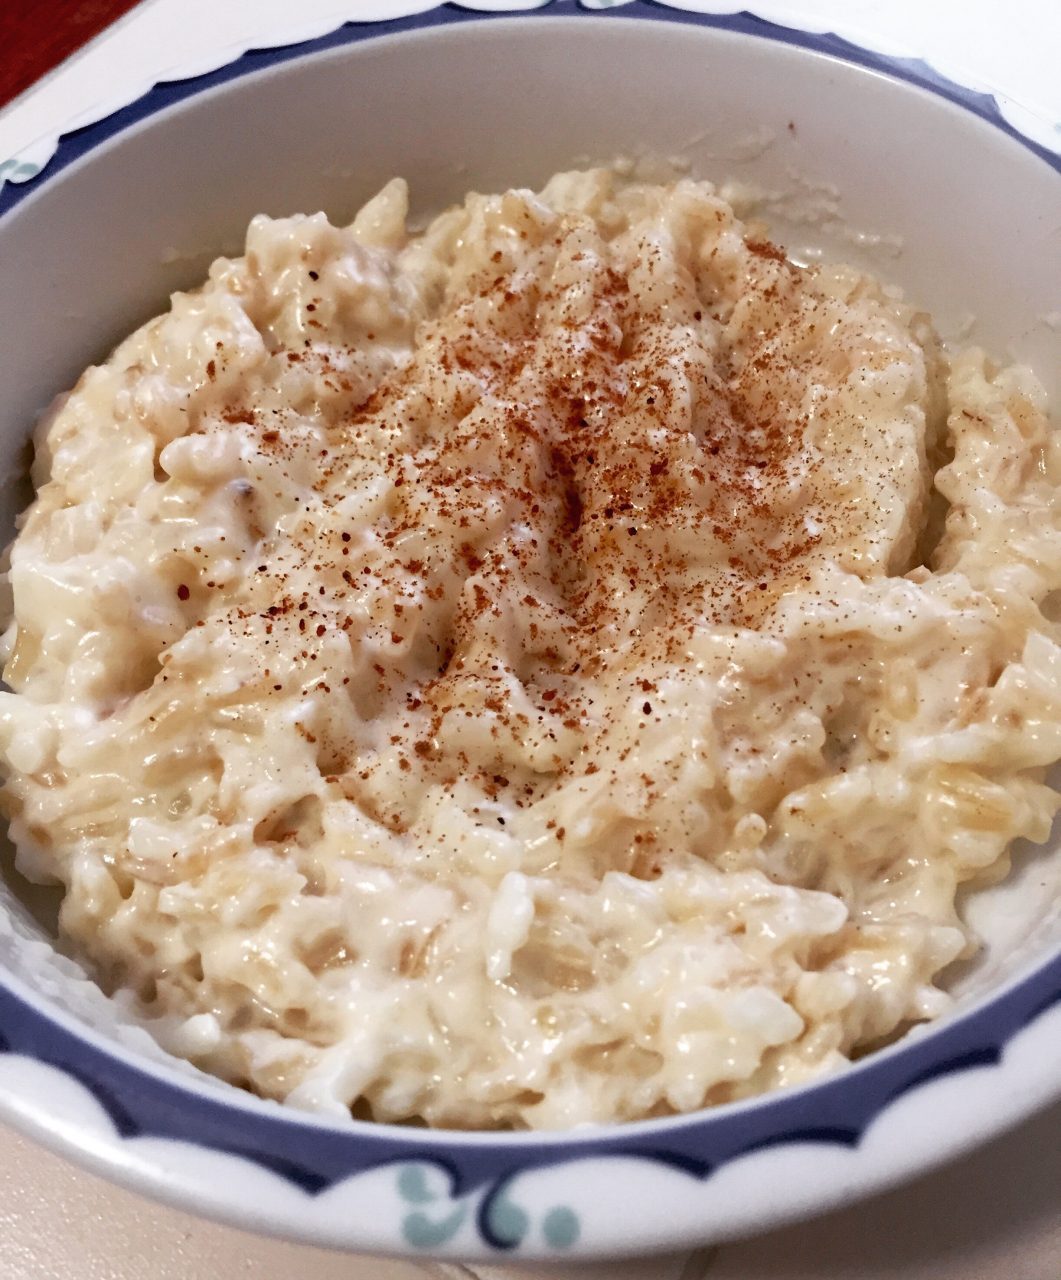
This was my first time making rice pudding and I wanted to make it with some fiber, but also not too much so that my daughter doesn’t have bloating, and flatulence due to a high fiber content. Children ages 3- 5 can only have about 11 grams per day. Anything more than that can discomfort their GI tract. So what I did was use half parboiled brown rice and half regular white medium grain rice.
INGREDIENTS:
1/4 cup washed parboiled whole grain rice (I use Unlce Ben’s)
1/4 cup washed white rice
2-1/4 Cups Organic Whole Milk
1 Tbsp of Organic Butter
1 Tbsp turbinado sugar or 100% maple syrup (if you like it sweeter you may add more )
1 tsp vanilla extract
DIRECTIONS:
In a heavy duty sauce pan. Combine the rice, sugar, butter and milk and stir. Bring to a slow boil. Reduce the heat to low and simmer stirring every 2 minutes for 45 minutes until the consistency becomes thick and rice becomes very tender. Turn off heat and stir in your vanilla. Serve with a dust of Ceylon Cinnamon and a pinch of Nutmeg for warmth. Enjoy!
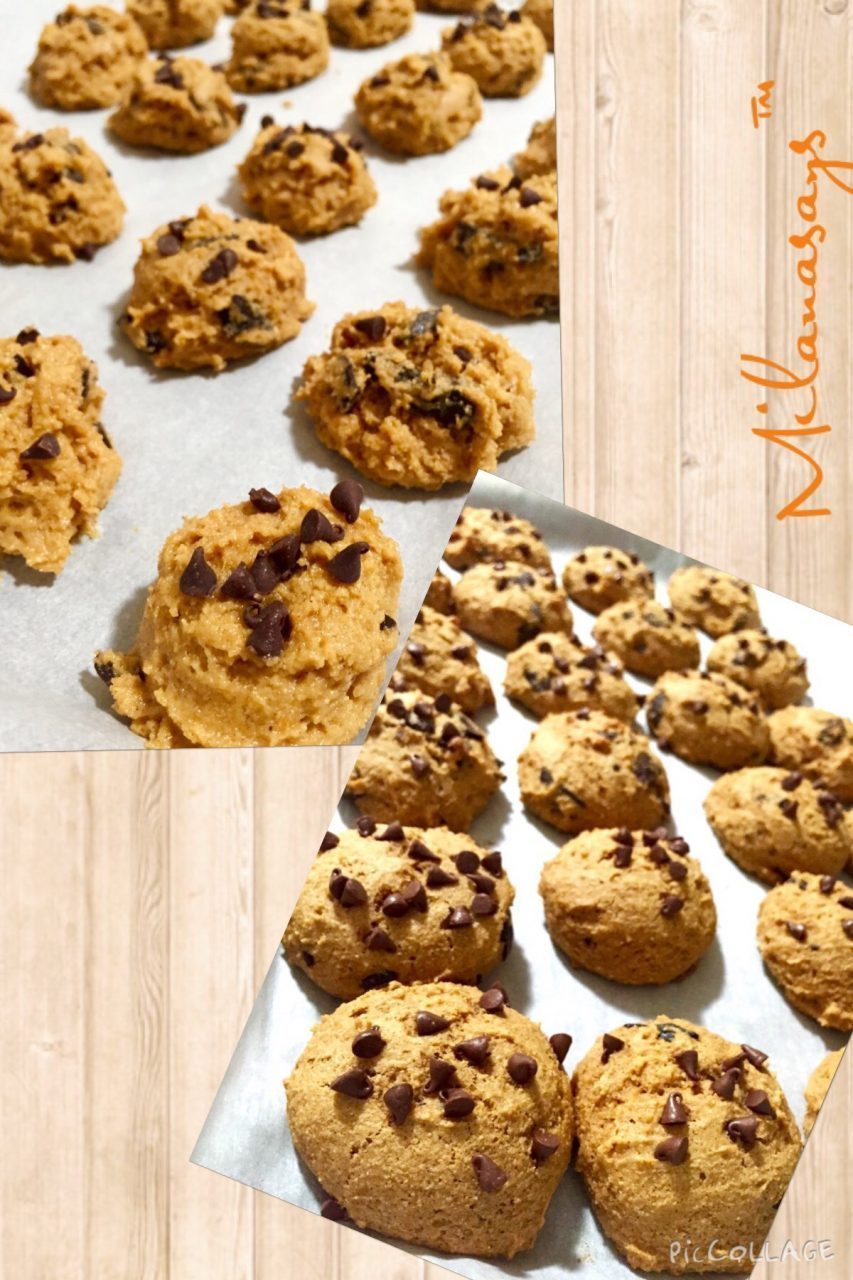
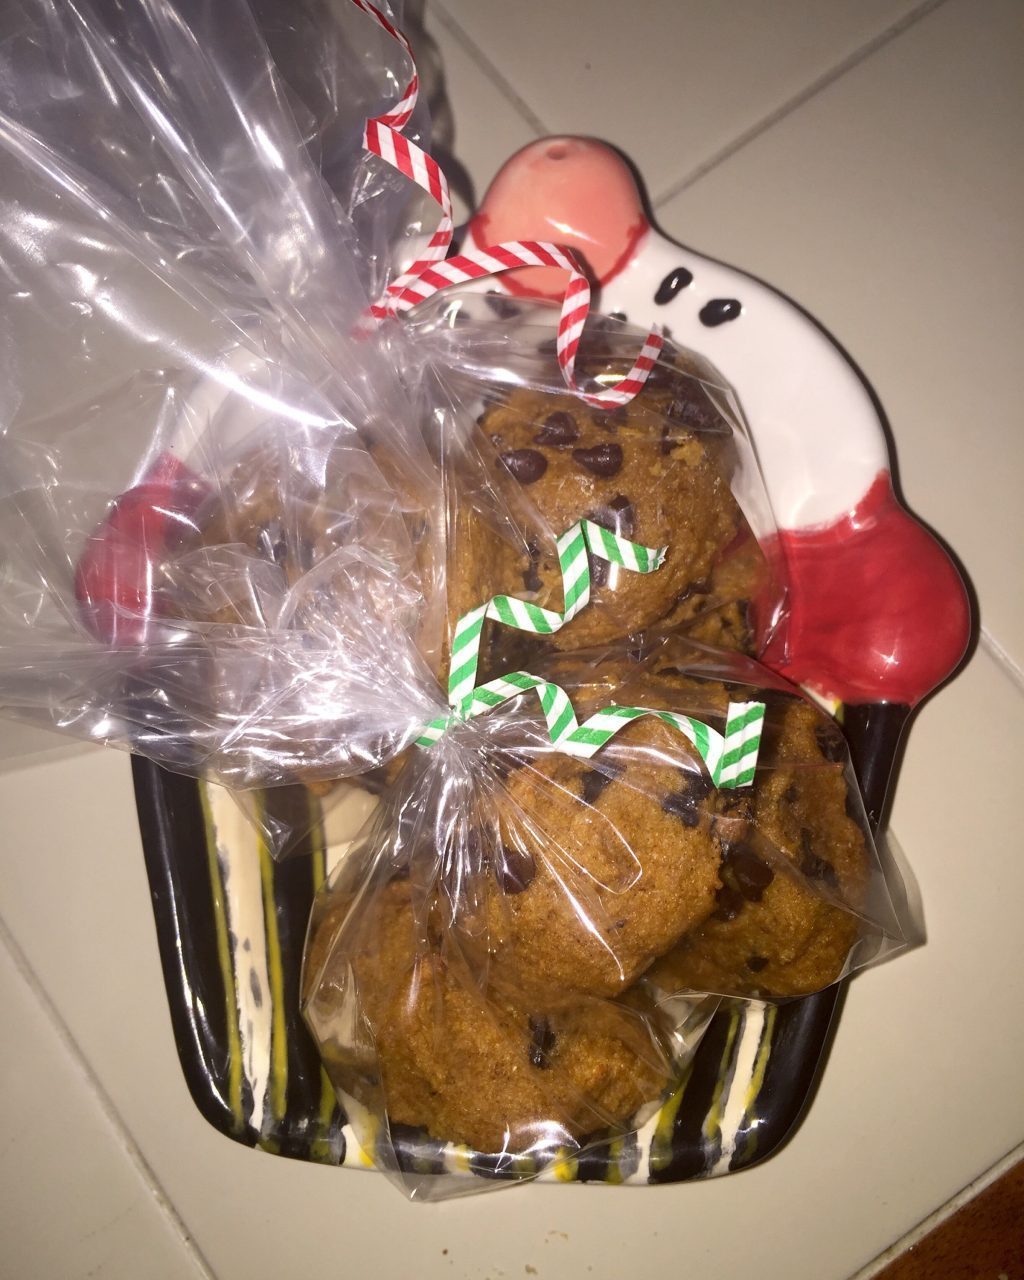
1 cup dark chocolate chunks or chips (I did half mini semi sweet chocolate chips and half dark chocolate chunks)
INGREDIENTS:
Heat oven to 375 degrees. Line cookie sheets with parchment paper sheets (or lightly grease the cookie sheet with cooking spray if you don’t have parchment paper). In the bowl of a stand mixer with paddle attachment combine pumpkin, sugar, oil, applesauce, vanilla and egg. Mix until well combined.
In a separate bowl, whisk together the flour, baking powder, cinnamon and salt. In another small bowl, dissolve the baking soda with the milk. Add both the dry flour mixture and the wet baking soda mixture to the pumpkin mixture. Mix well until incorporated.
Add in the chocolate chips and stir until evenly combined.
Using a small cookie scoop(medium scoop is equal to 1 tablespoon), drop mounds of the cookie dough on the prepared cookie sheets.
Bake for 10 to 12 minutes. Allow the cookies to cool for slightly before removing to a wire rack to cool completely.